AWS OpsWorksで起動されたインスタンスの中身を見てみる
AWS OpsWorksを使ってHAProxyのレイヤーを追加し、HAProxyインスタンスを立ち上げてみる。
自分のkeypairを使うように設定すれば、SSHでログインすることができる。
早速ログインしてみる。
ec2-userでログインができた。
OpsWorksの動作に関連しそうなものは以下のディレクトリにあった。
[ec2-user@stratus aws]$ sudo ls opsworks/current/bin
chef-client               gli             opsworks-agent-cli        restclient
chef-solo                 knife           opsworks-agent-installer  s3curl.pl
convert_to_should_syntax  lockrun         opsworks-agent-updater    shef
edit_json.rb              nokogiri        prettify_json.rb          thor
erubis                    ohai            rake
extract                   opsworks-agent  rake2thor
chef-soloやchef-client, opsworks-agent-cliなどがある。
AWSのドキュメントには、それぞれのインスタンスでchef-soloが動いていると書かれていた。
以下抜粋
Here's how it works: Chef Solo runs on every instance, and AWS OpsWorks sends commands to each instance to run recipes that set up, configure, and shut down the instance. You can extend these actions with your own custom recipes. You can also run your custom recipes on a specific instance or on all instances in your stack.
さらにopsworks-agent-cliで以下のようなコマンドも実行できる。
- agent_report
- get_json
- instance_report
- list_commands
- run_command
- show_log
- stack_state
詳細は以下。
http://docs.aws.amazon.com/opsworks/latest/userguide/agent.html
試しにget_jsonコマンドを実行してみた。(環境をまるさらしだが、すぐ消すので良しとしよう。。)
$ sudo opsworks/current/bin/opsworks-agent-cli get_json
{
  "recipes": [
    "opsworks_custom_cookbooks::load",
    "opsworks_ganglia::configure-client",
    "ssh_users",
    "agent_version",
    "haproxy::configure",
    "opsworks_stack_state_sync",
    "opsworks_custom_cookbooks::execute",
    "test_suite",
    "opsworks_cleanup"
  ],
  "opsworks_bundler": {
    "version": "1.0.10",
    "manage_package": null
  },
  "opsworks_rubygems": {
    "version": "1.8.24"
  },
  "opsworks": {
    "deployment": null,
    "valid_client_activities": [
      "reboot",
      "stop",
      "setup",
      "configure",
      "update_dependencies",
      "install_dependencies",
      "update_custom_cookbooks",
      "execute_recipes"
    ],
    "applications": [
      {
        "application_type": "php",
        "slug_name": "php_app",
        "name": "php-app"
      }
    ],
    "ruby_version": "1.8.7",
    "activity": "configure",
    "ruby_stack": "ruby_enterprise",
    "stack": {
      "name": "SampleStack3"
    },
    "instance": {
      "ip": null,
      "id": "3d9fc521-1bfa-4d82-b74c-f0761383394c",
      "private_ip": "10.132.159.132",
      "aws_instance_id": "i-d75147d4",
      "backends": 5,
      "layers": [
        "lb"
      ],
      "public_dns_name": null,
      "hostname": "stratus",
      "region": "ap-northeast-1",
      "instance_type": "m1.small",
      "availability_zone": "ap-northeast-1a",
      "private_dns_name": "ip-10-132-159-132.ap-northeast-1.compute.internal",
      "architecture": "i386"
    },
    "agent_version": "104",
    "layers": {
      "lb": {
        "id": "f64dc03e-0c01-4f41-b588-b8289e03deca",
        "name": "Load Balancer",
        "instances": {
          "stratus": {
            "ip": null,
            "elastic_ip": "54.249.245.56",
            "private_ip": "10.132.159.132",
            "aws_instance_id": "i-d75147d4",
            "created_at": "2013-03-13T06:38:58+00:00",
            "status": "online",
            "booted_at": "2013-03-13T06:40:49+00:00",
            "backends": 5,
            "public_dns_name": null,
            "region": "ap-northeast-1",
            "instance_type": "m1.small",
            "availability_zone": "ap-northeast-1a",
            "private_dns_name": "ip-10-132-159-132.ap-northeast-1.compute.internal"
          }
        }
      },
      "php-app": {
        "id": "c38c9a7f-90eb-4764-8ebd-3b48592f57cb",
        "name": "PHP Application Server",
        "instances": {
          "altocumulus": {
            "ip": "54.249.207.244",
            "elastic_ip": null,
            "private_ip": "10.162.54.166",
            "aws_instance_id": "i-2b5d4b28",
            "created_at": "2013-03-13T06:48:12+00:00",
            "status": "online",
            "booted_at": "2013-03-13T06:49:30+00:00",
            "backends": 5,
            "public_dns_name": "ec2-54-249-207-244.ap-northeast-1.compute.amazonaws.com",
            "region": "ap-northeast-1",
            "instance_type": "m1.small",
            "availability_zone": "ap-northeast-1a",
            "private_dns_name": "ip-10-162-54-166.ap-northeast-1.compute.internal"
          },
          "stratocumulus": {
            "ip": "54.249.153.134",
            "elastic_ip": null,
            "private_ip": "10.152.46.168",
            "aws_instance_id": "i-07405604",
            "created_at": "2013-03-13T07:30:05+00:00",
            "status": "online",
            "booted_at": "2013-03-13T07:31:22+00:00",
            "backends": 5,
            "public_dns_name": "ec2-54-249-153-134.ap-northeast-1.compute.amazonaws.com",
            "region": "ap-northeast-1",
            "instance_type": "m1.small",
            "availability_zone": "ap-northeast-1a",
            "private_dns_name": "ip-10-152-46-168.ap-northeast-1.compute.internal"
          }
        }
      }
    },
    "sent_at": 1363160598,
    "rails_stack": {
      "name": null
    }
  },
  "opsworks_custom_cookbooks": {
    "recipes": [

    ],
    "enabled": false
  },
  "deploy": {
    "php_app": {
      "memcached": {
        "host": null,
        "port": 11211
      },
      "rails_env": null,
      "migrate": false,
      "ssl_certificate_ca": null,
      "auto_bundle_on_deploy": true,
      "ssl_support": false,
      "domains": [
        "php_app"
      ],
      "database": {
        "reconnect": true,
        "host": null,
        "database": "php_app",
        "password": null,
        "username": "root"
      },
      "ssl_certificate": null,
      "symlink_before_migrate": {
        "config/opsworks.php": "opsworks.php"
      },
      "application_type": "php",
      "symlinks": {
      },
      "mounted_at": null,
      "restart_command": "echo 'restarting app'",
      "document_root": null,
      "sleep_before_restart": 0,
      "application": "php_app",
      "deploy_to": "/srv/www/php_app",
      "scm": {
        "user": null,
        "repository": "git://github.com/funasaki/helloworld-php.git",
        "password": null,
        "revision": null,
        "scm_type": "git",
        "ssh_key": null
      },
      "ssl_certificate_key": null
    }
  },
  "haproxy": {
    "static_applications": {
    },
    "health_check_method": "GET",
    "rails_applications": {
    },
    "nodejs_backends": [

    ],
    "php_applications": {
      "php_app": {
        "domains": [
          "php_app"
        ],
        "application_type": "php",
        "mounted_at": null
      }
    },
    "enable_stats": true,
    "nodejs_applications": {
    },
    "php_backends": [
      {
        "ip": "10.162.54.166",
        "backends": 10,
        "name": "altocumulus"
      },
      {
        "ip": "10.152.46.168",
        "backends": 10,
        "name": "stratocumulus"
      }
    ],
    "rails_backends": [

    ],
    "stats_url": "/haproxy?stats",
    "static_backends": [

    ],
    "stats_password": "mypassword",
    "stats_user": "opsworks",
    "health_check_url": "/"
  },
  "ssh_users": {
  }
}
さらにログファイルも当然だがあった。
$ ls /var/log/aws/opsworks
installer.log           opsworks-agent.log  user-data.log
opsworks-agent-cli.log  updater.log
Amazon LinuxにZabbix 1.8.16をインストール
Amazon Linux 2012.09にZabbix 1.8.16をインストールしました。
そのときに以下のページを参照させて頂きました。
http://dev.classmethod.jp/cloud/aws/zabbix1_8_15-on-amazon-linux/
Amazon RDS(MySQL)のログファイル出力について
Amazon RDSでログファイルにアクセス可能になりました。
【AWS発表】Amazon RDS - より簡単にログファイルにアクセス可能に
今まではRDS MySQLのgeneral logなどはRDSのテーブル内に出力していました。
上記機能により、テーブルではなくファイルのみに出力させることが可能となっています。

TABLEかFILEか、どちらかを選択する形です。
ファイルの出力先の場所はgeneral_log_fileの場合は、/rdsdbdata/log/general/mysql-general.logですが、こちらの出力先の場所を変更することは出来ないようです。
また、ログファイルのサイズが大きくなりすぎてしまい、DBのパフォーマンスに影響が出てしまうのを避けるため、以下の条件になったときにログファイルが自動的にrotateされます。
- When disk space usage is greater than 90% of the allocated space and a log uses either more than 10% of the allocated storage or the log uses greater than 5 GB.
- If a log uses more than 20% of the allocated storage or a log uses greater than 10 GB, regardless of total disk usage.
参照
http://docs.aws.amazon.com/AmazonRDS/latest/UserGuide/USER_LogAccess.Concepts.MySQL.html
GitマスターサーバをAmazon Linuxにインストールしてみる
Gitマスターサーバにgitをインストールする。
$ sudo yum install git git-all git-daemon
$ git --version
git version 1.7.4.5
xinetdを使ってgitサーバを起動する
sudo /etc/init.d/xinetd start
gitの設定ファイルでdisable = no に変更
sudo vi /etc/xinedt.d/git
# default: off
# description: The git damon allows git repositories to be exported using \
#       the git:// protocol.

service git
{
        disable         = no
        socket_type     = stream
        wait            = no
        user            = nobody
        server          = /usr/libexec/git-core/git-daemon
        server_args     = --base-path=/var/lib/git --export-all --user-path=publ
ic_git --syslog --inetd --verbose
        log_on_failure  += USERID
}
xinetdをrestartする。
sudo /etc/init.d/xinetd restart
リポジトリを作成する。
cd /var/lib/git
sudo mkdir test
cd test
sudo git --bare init --shared
sudo chmod 777 -R test
次にリモートのGitクライアントの設定
Gitをインストールする。
sudo yum install git
サンプルテキストの作成
mkdir ~/test
cd ~/test
vi test.txt
aiueo
作成したテキストをcommitする
git init
git add .
git commit -m "First Commit"
リモートのGitマスターサーバに接続するためのSSHの設定をする
vi ~/.ssh/config
Host ec2-xx-xx-xx-xx.ap-northeast-1.compute.amazonaws.com
User ec2-user
IdentityFile ~/.ssh/xxxxxx.pem
sudo chmod 600 /home/ec2-user/.ssh/config
sudo chmod 600 /home/ec2-user/.ssh/xxxxxx.pem
リモートのマスターを追加する
$ git remote add origin ssh://ec2-user@ec2-xx-xx-xx-xx.ap-northeast-1.compute.amazonaws.com/var/lib/git/test
リモートのマスターのリポジトリにpushする。
$ git push origin master
これで、マスター側の該当ディレクトリを見ると
$ ls -F
branches/  config*  description*  HEAD*  hooks/  info/  objects/  refs/
branchesディレクトリ等いろいろできている。
まだ確認できることはありそうだけど、今回はここまで。
ElastiCacheを使ってみる
Amazon ElastiCacheはインストール、構築不要のmemcachedクラスタ。
現状はMemcached 1.4.5, 1.4.14 に対応しているようです。
使ってみて気づいたことは以下です。
- ElastiCacheへはEC2(VPC)インスタンスからのみアクセスが可能。
- ElastiCacheのセキュリティグループの設定により、指定したセキュリティグループを持ったインスタンスしかアクセスを許さない。
- Management ConsoleでJavaとPHPのクライアントアクセスライブラリを取得可能
それではElasticCacheを起動して、Java Clientからアクセスしてみます。
まずは、作成・起動。
Management Consoleから、
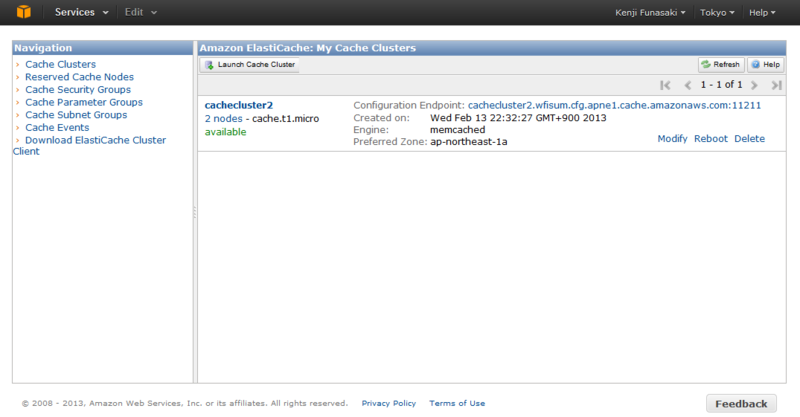
ElastiCacheを起動します。
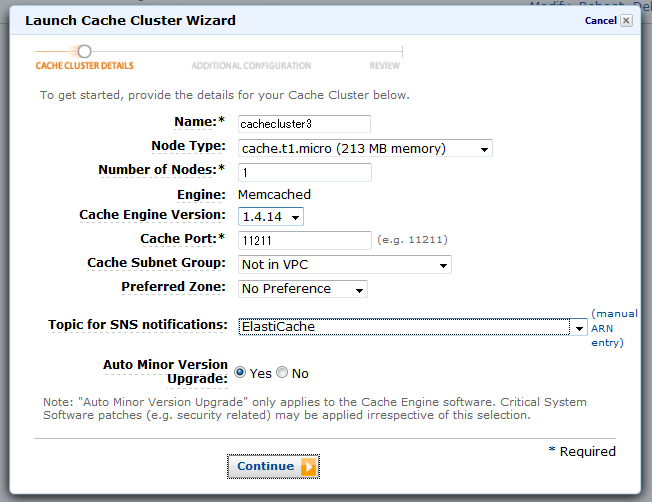
起動画面で名前、Node Type(インスタンスのタイプ)、Nodeの数、等を指定します。
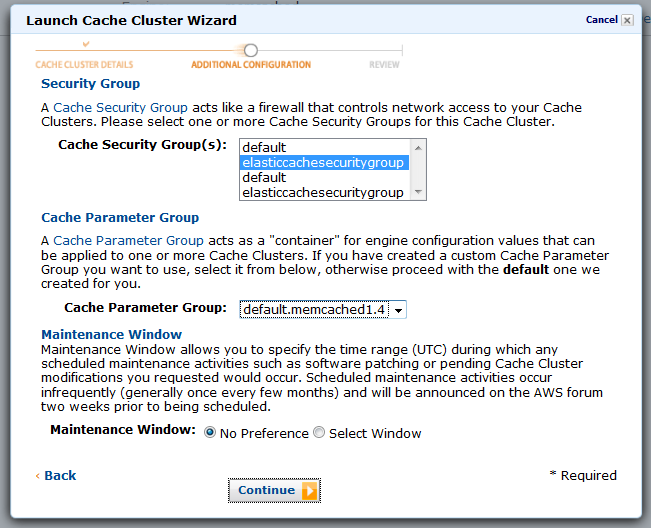
Cache Security Groupを指定します。ここで指定するものは事前に作成しておいたものを利用します。Cache Security Groupの中では、EC2のどのセキュリティグループ(を持つインスタンス)をアクセス許可するかを指定します。
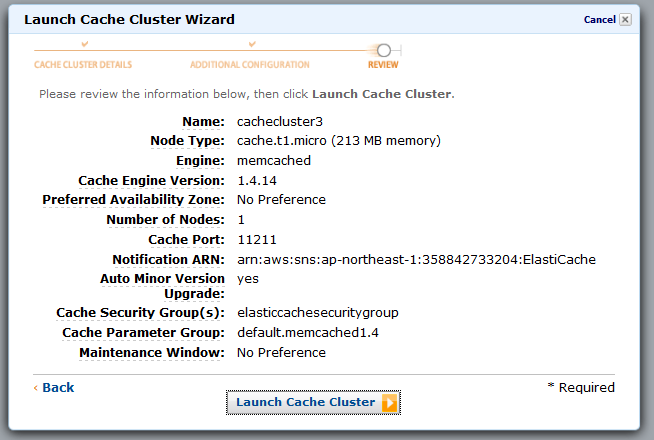
確認してLaunch Cache Clusterします。

これで起動完了すれば、エンドポイントおよびデフォルトポート11211番を使ってアクセスできるようになります。
ただ、上記にもあるようにEC2のセキュリティグループを持ったインスタンスしかアクセスできないため、ローカルのPCからElastiCacheクラスタノードに直接アクセスできません。(試したかったのですが。)
なので、今回はEC2インスタンス上で以下のJavaのソースコードを作成して、コンパイルしたものでアクセスしてみました。
import java.io.IOException;
import java.net.InetSocketAddress;

import net.spy.memcached.AddrUtil;
import net.spy.memcached.BinaryConnectionFactory;
import net.spy.memcached.ClientMode;
import net.spy.memcached.MemcachedClient;


public class ElastiCacheSample {

        public static void main(String[] args) {
                String hostname = "cachecluster2.wfisum.cfg.apne1.cache.amazonaws.com";
                int portNum = 11211;
                String hostnamePort = hostname + ":11211";
                String key = "12345";

                try {
                        MemcachedClient c = new MemcachedClient(new InetSocketAddress(hostname, portNum));
                        // Store a value (async) for one hour
                        c.set("key1", 3600, key);
                        // Retrieve a value.
                        Object myObject=c.get("key1");
                        c.shutdown();
                } catch (IOException e) {
                        e.printStackTrace();
                } catch (Exception e) {
                        e.printStackTrace();
                }
        }
}
今回はMemcachedClientのshutdown()メソッドを呼び出して、終了するようにしています。
こちらを実行すると
$ java -cp ".:./AmazonElastiCacheClusterClient-1.0.jar" ElastiCacheSample

2013-02-14 18:20:25.826 INFO net.spy.memcached.MemcachedConnection:  Added {QA sa=/10.160.135.101:11211, #Rops=0, #Wops=0, #iq=0, topRop=null, topWop=null, toWrite=0, interested=0} to connect queue
2013-02-14 18:20:25.837 INFO net.spy.memcached.MemcachedConnection:  Connection state changed for sun.nio.ch.SelectionKeyImpl@5ca46701
2013-02-14 18:20:25.858 INFO net.spy.memcached.MemcachedConnection:  Added {QA sa=/10.160.135.101:11211, #Rops=0, #Wops=0, #iq=0, topRop=null, topWop=null, toWrite=0, interested=0} to connect queue
2013-02-14 18:20:25.859 INFO net.spy.memcached.MemcachedConnection:  Added {QA sa=/10.160.83.93:11211, #Rops=0, #Wops=0, #iq=0, topRop=null, topWop=null, toWrite=0, interested=0} to connect queue
2013-02-14 18:20:25.865 INFO net.spy.memcached.MemcachedConnection:  Connection state changed for sun.nio.ch.SelectionKeyImpl@42704baa
2013-02-14 18:20:25.866 INFO net.spy.memcached.MemcachedConnection:  Connection state changed for sun.nio.ch.SelectionKeyImpl@5a77a7f9
2013-02-14 18:20:25.915 INFO net.spy.memcached.MemcachedConnection:  Shut down memcached client
以上のようにmemcachedに指定したkeyが追加され、取得も無事できました。
好きなドメイン名でS3のオブジェクトにアクセスさせる
S3で静的なWebホストが出来ることは周知の事実ですが、そのURLが
xxxxxx.s3-website-ap-northeast-1.amazonaws.com
といった形で、S3にホストしていることがユーザーさんにもわかってしまっていました。
S3を使っているのがわからないようにしたい!という場合には、WebサーバーのbackendでS3からファイルを適宜ダウンロード・アップロードするなどの対応が必要でした。
そこで、2012年12月に発表されたS3ルートドメイン機能を使えば、S3にホストしていることがわからないようにすることができます!
早速試してみました。
今回はxxxxx.infoサイトをS3ルートドメインとして使用します。
まずは、S3で二つのバケットを作ります。
- xxxxx.info
- www.xxxxx.info
作成後、これらの二つのバケットのアクセスを全員アクセス許可に設定します。

xxxxx.infoのバケット側の設定で、www.xxxxx.infoにリダイレクトする設定を入れます。

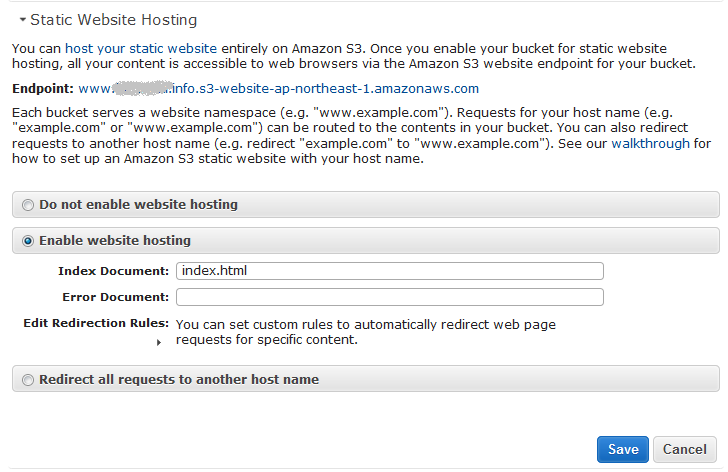
www.xxxxx.infoのバケット側でStatic Web Hostingの設定で、Indexドキュメントを指定します。
次にRoute 53で以下のようにxxxxx.infoとwww.xxxxx.infoの二つのレコードを作成します。
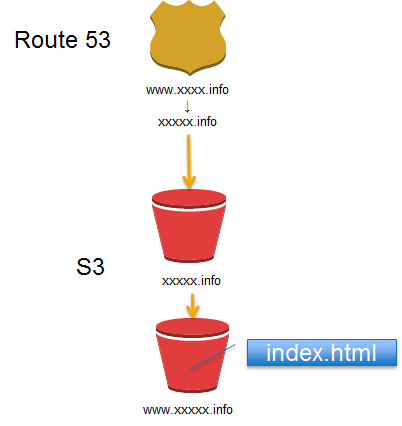
そして、www.xxxxx.info側はCNAMEでxxxxx.infoを指定、
xxxxx.info側はAレコードのエイリアスでS3のxxxxx.infoのバケット(=Static Web Host)を指定します。
これで準備完了です。
http://www.xxxxx.infoへアクセスすると、www.xxxxx.infoバケットにあるindex.htmlが表示されます。

設定イメージとしては以下のような感じですかね。
ご参考
http://docs.aws.amazon.com/AmazonS3/latest/dev/website-hosting-custom-domain-walkthrough.html
Route 53でELBと通常のサーバをアクセス分散させてみる
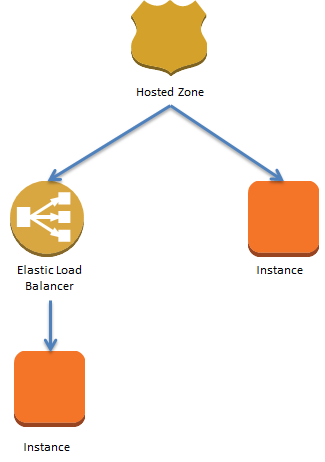
下記のような構成をRoute 53の重みづけラウンドロビンでアクセス分散できるか試しました。
結果としては、アクセス分散できます。
ただ1点注意が必要なのは、Route 53でELBにエイリアス機能を使ってアクセスを割り振る場合に、TTLの値をRoute 53側で現状セットできないことです。
フォーラムに以下のような説明がありました。
Currently, Amazon Route 53 supports aliases only for routing traffic to
Elastic Load Balancing domains. You cannot set the time to live (TTL)
for alias records; Amazon Route 53 honors the Elastic Load Balancing TTL.
For the current TTL value for Elastic Load Balancing, see the introduction
to "Using Domain Names With Elastic Load Balancing."
https://forums.aws.amazon.com/thread.jspa?messageID=259743
ELB はデフォルトで60秒のTTLがセットされているので、今回は通常のインスタンス側に割り振る場合もTTLを60秒にしました。

重みづけラウンドロビンによって、ELBと通常インスタンスへのアクセスを分散させる設定をしています。
これをdigコマンドを使って、同じホスト名に対してELBと通常インスタンスのIPが表示されるか確認してみました。
dig server3.funasaki.info
(途中省略)
server3.funasaki.info.  60       IN      A       54.248.139.176
(省略)
通常インスタンス:54.248.139.176
ELBの(この時点での)IP:54.248.223.170
※ELBのIPアドレスは変更することがあるので、IPアドレスはDNSに登録しないこと!
60とあるのは、TTLの時間が60秒という意味。これが、digコマンドを実行するたびに秒数が減っていくのがわかります。
dig server3.xxxxxxx.info
(途中省略)
server3.xxxxxxx.info.  50       IN      A       54.248.139.176
(省略)
dig server3.xxxxxxx.info
(途中省略)
server3.xxxxxxx.info.  30       IN      A       54.248.139.176
(省略)
dig server3.xxxxxxx.info
(途中省略)
server3.xxxxxxx.info.  5       IN      A       54.248.139.176
(省略)
60秒経過後、再度digコマンドを実行すると、以下のように今度はELB側のIPアドレスを返すようになりました。
server3.xxxxxxx.info. 60 IN A 54.248.223.170
このように、ちゃんとIPが変わっているので、負荷分散できますね!
DNSのキャッシュが効いてて、IPが変わらない場合もあるので要注意ですが!